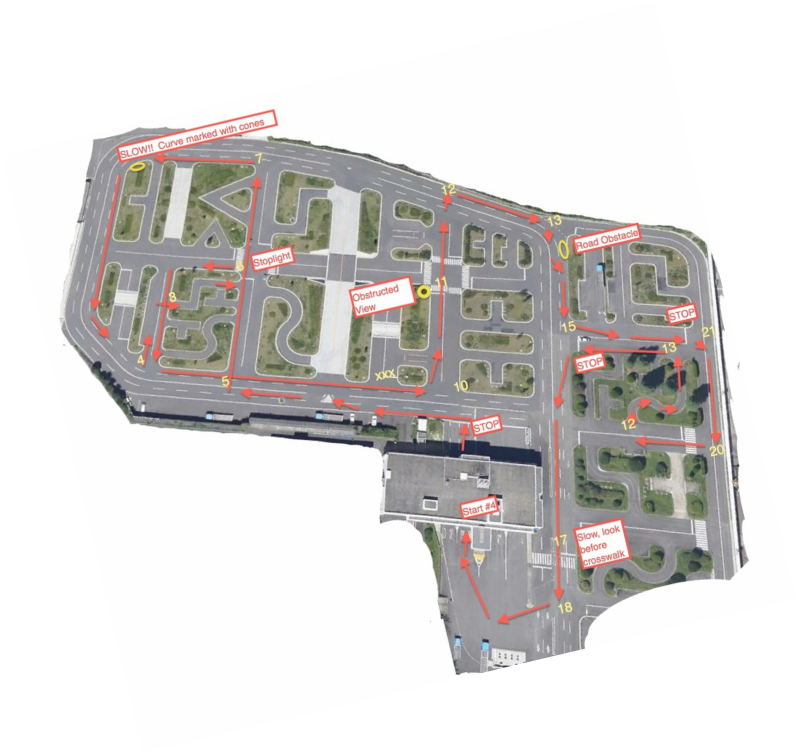
Above is a course map I put together using the map from Google Earth. It should give a pretty clear view of the course and the obstacles. And, here’s a good YouTube video of the actual course although the start is clipped and she didn’t do the S-curve bits at the end. http://www.youtube.com/watch?v=bMscg1_k6-g
Step 3 - The Practical Test
At Kanagawa, you’ll ride in the back seat of the car as the person before you is being tested. After you return to the station, the tester will ask you to wait outside the car while he critiques the examinee privately. Then, it is your turn. (In my case, the person I rode with had no experience in driving and would have been a menace. My short ride with this examinee was truly cringe worthy. I felt sorry for this person as they drove up against, then (in panic mode) continued over, the curb in the crank. The tester stopped the exam and got a bit agitated. Maybe I was lucky, because following that examinee, anyone would look like a pro.
1. Before getting in the car…
a) Check at the front and rear of the car…bend down low enough to see that nothing is under the car and it is clear of obstacles.(??) However, in reality, on the day of the test, none of the people taking the test at the Kanagawa center did this, and neither did I. It didn’t seem to be necessary.
b) Before opening the door, look both ways… imagine you’re on a busy street even though you’ll most likely be standing on a curb. *Although I did this on the day of the test, the test proctor was already in the car and would have had no way to see if I did this or not.
2. Pre start check after entering the car…
a) Lock the door behind you (my instructor said it is important to do this first thing) *I forgot to do this but still passed the exam.
b) Adjust the seat - with your foot on the brake and your hand on the steering wheel, adjust the seat forward or back on the rails.
c) Adjust the seat back (even if it feels fine, show that you are checking… best to move it a bit… or so said my instructor).
d) Belt - Put on your seat belt (make sure to do b, c and d before adjusting the mirrors since your mirrors would be out of whack if you adjust them then change the seat)
e) Mirrors - check the mirrors… and adjust the interior rearview mirror (my instructor said it wasn’t necessary to move the outside mirrors... but best to make sure you show you’re looking at them. You should actually touch the rearview mirror even if it is ok.)
f) Check brake and car is in Park- to make sure the parking brake is set and the car is in park
g) Start the car - put your foot on the brake and start the car
h) Blinker - *although it seems counter intuitive since you will be going straight ahead, you must put the appropriate blinker on to indicate you are pulling away from the curb.
i) Shift / Release parking brake - put the car in drive, then release the parking brake (in that order… or so said my instructor)
j) Look carefully - before actually moving forward make sure to check mirrors and look right / left and look over shoulder.
The Course
Once around the block familiarization ride - You will be asked to do a quick go around at the start point to get comfortable with the car… this will require 4 quick right turns before returning to where you began. After starting the car, put on appropriate blinker, pull straight forward to the stop sign… count 3 seconds… look both ways… turn right… move to intersection (also a stop sign, so stop for 3 seconds), signal right, look both ways, turn right. Then, go forward to crosswalk (again looking both ways before crossing) then turn right after checking mirrors and looking over shoulder. You’ll once again be in the start point area so go to the lane your instructor indicates (use signals as necessary. Pull up to the pole…. stop 30 cm behind the pole and 30 cm from curb). You’ll be asked to turn off the engine. (Don’t forget to put the car in park, then use the emergency brake before turning off the engine.)
I’m not sure if you can accumulate negative points on this part of the test or not, but it probably doesn’t help if you are very tentative or you roll through the stop sign (as I saw people do). Probably best to do this go-around as if you were being graded. Definitely come to a full stop for the full 3 seconds at each stop sign.
*Also, the brakes on the car were very 'grabby.' The slightest touch and you'd stop sharply. It was nearly impossible to stop smoothly in the car I used but then again, they want 'clear' stops, so maybe that was a good thing.
a) Starting Out - (from start point to turn point #5) - Again, make a show of checking the car is in park and the parking brake is set before starting the car. With your foot on the brake, put the car in drive and release the parking brake. As before, put on blinker for left turn… pull straight forward to the stop sign (stop 3 seconds just before the line) check mirrors, and look both ways, then over left shoulder. If no cars are there, make a left. You'll be turning right at #5, so you'll need to signal to move to the right-hand lane, check mirrors, look over your shoulder, move to the right lane then yield to any oncoming traffic. If none, proceed to the left-hand side of the road and continue to the stoplight. (You want to get your speed up a bit between the start and #5. The testers want to see that you go brake and speed up “hakiri” clearly. So…. don't dawdle but don't go too fast either, given the quick right turn.)
b) The Circle Route, from #5 to #4 - Go to the stoplight. Stop if red, but if green, go ahead (while checking for traffic left and right). Proceed to turn #7, and be sure to signal a left turn. Look carefully for traffic and also be sure to check over your left shoulder. If clear …slowly turn to the left and continue (always keep to the left of the lane). At the corner, you’ll see several yellow and black striped cones. At this point, you must slow to what may seem a ridiculously slow speed (like a slow walk) as you round the corner until you’re past the cones. Don’t hurry! Then, accelerate in the straightaway but slow before, not in the curve. Don’t get too far to the right as you go around this curve (like I did). Then be sure to signal for a left turn at turn #4 (it is right after the curve so make sure to get the blinker on in time). As always, check mirrors and look over left shoulder before turning left.
c) The Cranky Part - #4 and back again - As soon as you turn left at #4, you’ll need to move right and hug the centerline for a right turn into the crank course at #3. Signal a right turn, check mirrors, wait for traffic, check again, then turn into the crank course. Negotiate the cranks (easy does it.. go slow) and as you come out, prepare for a left turn at the stoplight. This is kind of a weird part… You’ll come out of the crank area perpendicular to a street where there is a stoplight to your left. So, at the end of the crank area, signal a left… look for approaching traffic as you near the corner… look left/right (of course checking mirrors and looking over left shoulder before turning left). As long as there is no approaching traffic, you can edge the nose of the car out into the street. If the light is red… wait there, even if it feels weird to have the front of your car half out in the road. If green, look both ways before proceeding then make your immediate left turn and hug the left side of the street (given that you’ve just come out of the crank section, this is more like a 180 degree turn… so turn sharp and get your car on the left side of the road). (*When I took the test, I was afraid of clipping the curb so the front right part of the car went over the white center line before I could straighten up and get to the left of the road again. The tester dinged me on that, although, given that I wasn’t driving a sports car and the turn is a 180, it’s pretty difficult to make this turn without going a bit over the center line or going up over the curb.) Set up for another left turn… blinker, mirrors, left shoulder… then turn left and go straight to #4, where you’ll be taking another left. It isn’t a stop, so slow, look left right and over left shoulder then turn.
d) Straightaway, Obstructed View and Obstacles - #4 - #15 After turning left onto the main drag, accelerate “hakiri” but prepare for a left turn at the “red” #10 sign. (Don’t confuse it with the black #10 just before it that heads you off to the railroad tracks). Take a left at the red #10 (observing proper procedures) then go to the marked crosswalk area at #11. This area simulates a blind corner (lots of bushes on the corner’s left that screen your view). Slow way down, then proceed very slowly (basically creep forward) looking left and right, you’re sure it is clear. Then proceed through the intersection and prepare for a right turn at #12. Use blinker, check mirrors, look over right shoulder, change to right lane. Slow at the corner… look carefully, for traffic. If traffic is approaching, even at a distance, it is always better to wait. Once you go ahead, be sure to keep going straight to the outside edge of the road here so that you end up hugging the left side of the road. (I kept wanting to make a smoother, more rounded corner and my instructor kept grabbing the wheel to force me to go straight so that I had to make a rather sharp turn to the right to line up close to the left side of the road.) Coming up, on the corner (#13) is an ‘obstacle’, (several cones) blocking the left lane. Use your blinker to signal a lane change to the right, look over shoulder, move to right lane. As soon as you’re in the right lane, immediately signal left, look over your left shoulder, move to left lane (after you’re past the cones) and keep signal on for immediate left at #15.
e) S curve (#15 and back to #15) - Turn left (follow rules for left turn) at 15. Move to centerline for right turn at #21. This intersection has a stop sign so be sure to stop for 3 seconds. Follow rules for right turn and be ready for another immediate right at 20. (move to center line) Follow rules for right turn at 20. After the turn, prepare for another right into the S-curve section… as always following procedures for a right turn. The S-curves are pretty easy if you have driving experience but take them slowly and cautiously. Coming out of the S curves, signal for a left, follow the rules for a left turn and continue to #15 (stop sign at #15, so stop 3 seconds).
f) The Crosswalk – (#15 to Station 4) – Make your left turn at 15, prepare for a right turn back to the start point area… move to the right lane (using correct procedures), go straight and you’ll see a crosswalk marked on the street at #17. Slow down at the crosswalk, look both ways, then proceed. Then, following proper procedures make your right turn back into the start point area. Go back to station the tester indicates. Stop 30 cm from the curb and 30 cm before the black and yellow striped pole.
g) The End, but Don’t Blow It….. You’re not done yet so don’t forget the final steps. Remember to stop the car where you’re supposed to. Remember to signal as if you’re making a lane change as you approach the appropriate station … check mirrors. Stop the car, put it in park, set the parking brake, (in that order) then turn it off. Take off your seatbelt. Return the seat to a full back position on its rails. Unlock the door. At this point your tester will talk with you about how you did (or at least that is what they did that day with all the people they tested). Check for traffic before opening your door. Now, go wait for the results.
